
Thursday - Make Your Own Paper Projects
(Thanks to Eve and June at Folding Trees for the text and photos. Please visit their website for everything to do with the best paper creations online!)
1.
Lucky Wishing Stars
2. Pod Beads
3. Tissue Paper Carnations
LUCKY WISHING STARS
|
 |
|
To
give you an idea of size, I’ve made stars in 3 different
sizes to show you: For the rest of this tutorial, I will be using a paper strip cut from a magazine page. For reference, the front is pink and the back is peachy orange with text). |
|

|
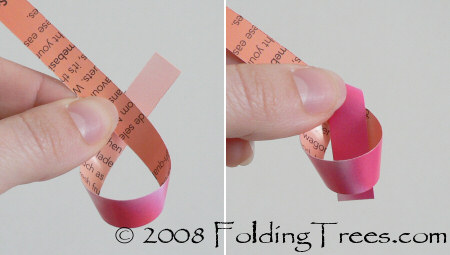
Step 1: Make a loop at one end of your strip, and pass the short end through the loop as if you are forming a basic knot: |
 |
|
Step 2: Pull both ends of the paper slowly to close up the knot. As it pulls tight, it will magically form a pentagon (5-sided) shape! |
 |
|
Step 3: Fold the short end up out of the way (right side facing out). If it is too long like mine, and sticks out beyond the edge of the pentagon, trim the end down. Turn the shape over so the side with the short end is facing you, then tuck the short end under the flap that runs across the pentagon: |
 |
|
Step 4: Now you can begin to wrap the rest of the strip around the pentagon. Fold the strip up over one side of the pentagon, making the fold line along the side of the pentagon. Do not crease the fold tightly. Continue to fold the strip over and over each side: |
 |
|
Step 5: When you get to the end of the strip, trim off the end if it sticks out beyond the edge of the pentagon, then tuck the end inside the flap that runs across the pentagon: |
 |
|
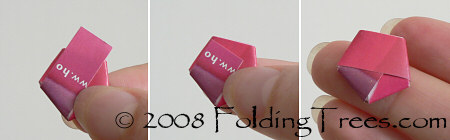
Step 6: Hold the pentagon between thumb and forefinger of one hand, then use a fingernail on your other hand to push in the middle of one of the other sides: |
 |
|
Rotate the pentagon and repeat until all 5 sides are pushed in, et voila! A puffy paper star! |
 |
POD BEADS
|
 |
|
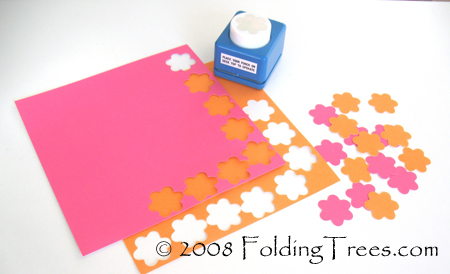
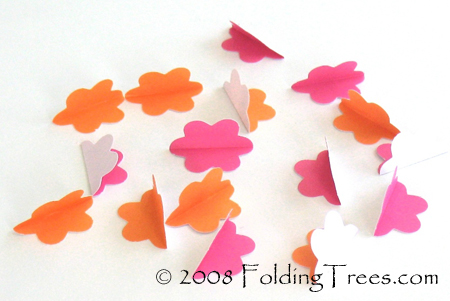
Start with punching out heaps of shapes from the paper. I used about 6 of each color for the small bead and 8 of each color for the larger ones but you might want to experiment and use more or less. |
 |
|
Fold the papers in half, making sure you have the colour you want to show off on the inside of your fold. I folded mine through the middle of the petal so you get a nice pointy bead. |
 |
|
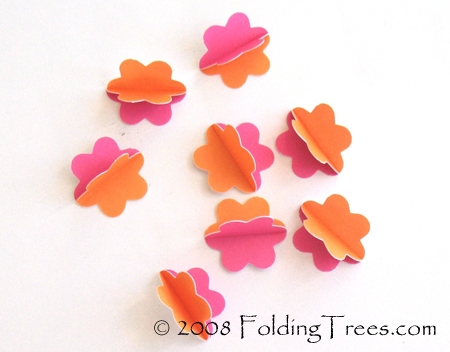
Now the tricky part starts; gluing the whole thing together. Try to be as precise as possible when you glue the shapes together. I first pair up all the colors so the glue has time to dry as in the picture on the right. |
 |
|
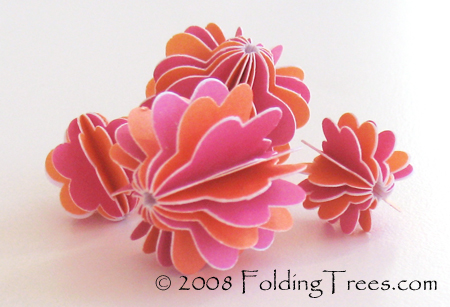
That’s all – you’re finished!! |
 |
|
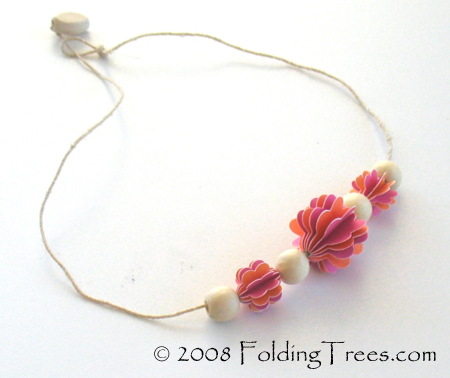
Now string them on a piece of twine with some wooden beads like I did, or you can pick a pretty ribbon and some sparkly beads to make it a bit more sophisticated. Time to get crafty! |
|
TISSUE PAPER CARNATIONS
|
 |
|
Here is a close up of the flowers – aren’t they lovely? |
 |
|
You will need: You can make your carnations any size, but I found that a 3″ (7.5cm) circle gives a realistic-sized flower. Fold your tissue paper in half again and again until it is just larger than your circle size. I used a 20×24″ sheet of tissue paper, which let me cut 48 circles at once – enough for 4-5 carnations! Find a suitably-sized circular container and draw around it with a pencil onto your folded tissue paper. |
 |
|
Start to cut out the circle, holding all the layers of tissue paper together. If you can’t cut through the whole thickness, try cutting half the layers at a time, then draw another circle to cut out the other half. I found that I could cut through 48 layers with no problem, as the tissue paper is so thin. You don’t have to cut too exactly, so don’t worry if some of the layers don’t come out as perfect circles. Use a large paper clip to help keep the layers together. |
 |
|
As you continue to cut, add a second paper clip on the opposite side of the circles to keep all the circles together. |
 |
|
This next step is the key to making the flowers look more realistic than standard tissue paper flowers. Take a marker pen with a complementary colour (a cheap kids’ pen is fine). A bold colour will give a more effective result. Use your non-writing hand to hold the edges of all the tissue-paper layers together, and use the side of the pen nib to begin to gently colour the edge of the circles. Take this slowly – if you press too hard, the tissue paper layers will separate. Colour a small section of the edge at a time, and go over each section a few times to ensure the colour is intense and the ink has saturated all the edges.
|
 |
|
Continue to colour around
the edge. When you are about halfway
through, move the paper clips to areas you have already
coloured,
and fill in the gaps. |
 |
|
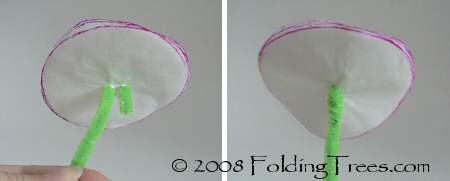
Remove the paper clips and select enough circles from the pile to make one flower. I used approx 12 circles per flower, but 8-10 circles would be fine. Keep these circles together and poke two holes near the centre of the circles. I used the end of a pipe cleaner to do this, but if your pipe cleaners aren’t sharp enough you could use a large needle or similar. Fold down about 1 inch of the pipe cleaner, and push the long end through one hole and the short end through the other hole. |
 |
|
Pull the ends all the way through, then twist the ends of the pipe cleaner together underneath the flower to keep all the circles together: |
 |
|
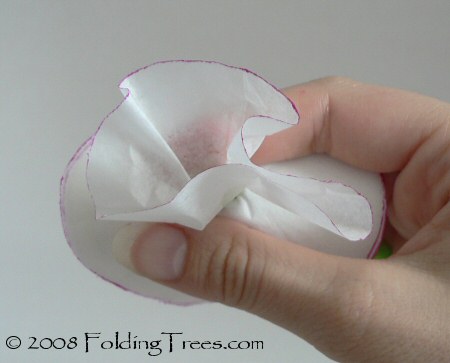
Now to make the petals. Separate the topmost circle and crumple it upwards from the centre. Scrunch up the paper randomly, but try to concentrate on the base of the petal (the centre of the circle) and leave the coloured edges alone. |
 |
|
Now repeat with each circle in turn. Crinkle each circle up individually, and try not to have the folds in the same place each time. You can see (below, right) how I am squeezing my fingers around the base of the petal each time I add a new circle. This stops the coloured petal edges from being creased into folds |
 |
|
Keep scrunching… When all the circles have been crumpled up, you will end up with a lovely carnation like this: |
 |
|
If you want to make the stems look more realistic, here are some ideas: Make a double-headed stem by cutting down one pipe cleaner to half its length (use wire cutters for this) then twisting it together with another completed stem: |
 |
|
I wasn’t satisfied with my green furry caterpillar stems, so I converted them with some floral wires and green floral tape: Cut the floral wire to the same length as your stem.
|
 |
|
Holding the wire and pipe cleaner stem together, start to wrap the floral tape tightly around them. Start about 1″ down from the flower head (below, left) and wrap up the stem to the head. Then wrap all the way down the stem to the bottom. To wrap without the tape getting tangled up, hold the tape steady and at an angle to the stem with one hand (below, right), and use your other hand to twirl the stem around, winding the tape around itself as it goes. |
 |
|
The floral tape will stick to itself, so there is no need to use glue to fasten it down. Remember to stretch the end of the tape as you wrap the end of the stem, to help it to stick securely. Make just one as a paper buttonhole. Make about a dozen, and you have a beautiful bouquet!
|
|
|
If you've enjoyed the information on this page, please consider buying my novel Cold Play. The story is set on a cruise ship in Alaska, and the crafts on this page were inspired by the daily passenger activities which take place on board the ship. In Cold Play, Jason Davey has literally run away to sea after the death of his makeup artist wife, finding work as a contract entertainer aboard a much-adored but soon-to-be-retired cruise ship, the Star Sapphire.But when three people from his past come board as passengers, Jason's routine week-long trip to Alaska becomes anything but. |

